Sunday 16 September 2018

Warhammer Quest Tileset. Work in progress.

Warhammer Quest. Hand Drawn Tileset. WIP.

So here is another video of an entire dungeon I created. Using several different methods I used before and using it all for this tileset. Huge difference. More work is needed to finish off this basic set. Afterwards, I plan on doing different themed dungeons using these tiles. Everything is on different layers, its all easily modified. By working on the base tiles (For the miniatures) these all will be quickly changed to ensure each tile looks different.

The Heroquest full dungeon board has been completed and uploaded. The quest that I have been doing below is also completed in the second draft. I have zipped all the work and uploaded it to my drive, that way I wont lose the work I have done.

Same as this basic set drawn up. I have zipped for the photoshop file and uploaded it. More coming up soon.


Tuesday 4 September 2018

Heroquest: Expansion update on the tiles.


So what ive done is kept the tiles on four separate boards. The additional rooms for the top deck have been taken out which can be placed on top or aside the board. Each main tileset has been numbered. Finally the unusual hull of the ship has been redrawn and sorted out on all the ships. Now its looking a little better.

Whats next...

Monday 3 September 2018

Heroquest expansion draft.

This is a project ive been working on and off for a while now. This is the first four tile board sections, the first four maps that ive done. I have one final board to do for the final quest section for the boss, but that will require a lot more detail in it.


The last modification for these tiles is cleaning and fixing the outer hull section of the vessel. Its dodgy. But will leave it for now as I will no doubt have a few things to finalise. Next image is a tile that will be used to go from one board to the next.


This quest revolves around your character(s) boarding an Imperial ship that was left decimated by a race of aquatic creatures. You are to board the ship, rescue survivors, kill the creatures and boss. Another day for an adventurer. Next updates will be up soon. Including additional quest characters, cards, monsters and the quest book. Which another completed draft have been done.

Sunday 2 September 2018

HEROQUEST BOARD FROM SCRATCH. ALMOST DONE?

Ok. So here, the shadows below all the walls (main rooms) have been added. Shadows from inside the rooms that are passing all room walls have been deleted and sorted out. The areas on the board needing sorted due to the obvious lines that separate one tileset from another, blended those and made it seamless. Best I can do it. Made the whole board sharper so it wasn't too dull. For the corridors and edges of the board. I added a slight lighting to it. The rooms are darker, but not too sure if adding any lighting to them would be better or not..


I might add more details to the board, weapons, rocks etc. But I'm still trying to do it right, I dont want to ruin the board.. so I'll keep trying it until I can master it a bit better.

The size of this has been halved as to be uploaded here.. its 3700 by 2704. Around 20MB. The actual size sits now at.. 7800 by 5700. 90.6MB. So its pretty large. But looking much better.

Thursday 30 August 2018

Myth Journeyman wave 3 arrived..

So guess its time to get through all the cards and material and sort them all from 1.0 to 2.0 and Journeyman.. it took a few hours longer than I thought it would take but at least its done, there is a few things from the two kickstarter's that I am not sure of what to do with, box them as part of 1.0 materials and hide them away or not? Not too sure..


Everything everywhere.. so all Hero cards and item cards, the slaughterhouse expansion were the main ones that took most of the time to go through. The base game and the basic five heroes had already been sorted in wave 2 when the 2.0 cards arrived, but both main expansions for Journeyman had a light and dark 10 card set to sort out for all five heroes..


Literally two hours later..


Once they were all sorted. Both the main five hero light and dark set were put back into the Journey main expansion boxes.. that left completely changing the Trickster, skald and Spriggan cards. As far as im aware, all other heroes in the game have a light journeyman set of 10 cards. So after I changed these three and the additional Journeyman hero cards out, I shoved the older cards with the 1.0 pile..


Far left.. this is the Hunter card set. I bought the sleeves and the additional 10 card set for Journeyman.. but to be honest, I dont know where the Hunter Hero comes from!? Was this a crossover hero from Recon or something else, I know one was from Dark Frontier.. the swordsman. But cant find an exact name of this Hunter anywhere.


Next was the item and quest cards.. I didn't know the packs I already had were pretty much all defunct. So trying to sort these out in their sets was hard until I could find something that identified which card goes into what set. Many of them are numbered but each set has a specific hero item card in each. Shoved the older stuff with the 1.0 pile for packing away.


All for the bin..


So this story quest and additional tokens from the first kickstarter, wasn't too sure what is going on with these, im not too sure if they were incorporated into the LE rulebook. But I will have a read through it later on and check again for it.


So the additional tiles, 2.0 slaughterhouse stuff have been sorted, older stuff put aside, item and quest cards sorted, In the stretch goal box there were even more duplicated monster cards from the first kickstarter in here, even though we got these in the second wave with the updated 2.0 cards and rulebook, so I have just left these in the box for now.


 That just leaves all the miniatures and huge world bosses to arrive in wave four.. so as much as I want to finally start playing Myth, I dont think I can with no stand in to use. So just a few more months and will hopefully be able to have this all completed. Looking forward to it all.


Monday 27 August 2018

Finding a perfect mix.

One of the reasons I tend not to use lighting on tiles, as much as I like how these turned out, its still not the effect I am looking for. These I did by copying my main file after blending the textures, adding a hue to the whole layer, adding lighting to it, so it disregards the lighting effect of the lower layer.


I am trying to go for a more flatter, dull colour and style. I will save these psd's until I can find a way to get the effect im looking for. Some of the ones I did before I like but I dont see those as final versions. So I will post the whole lot once I have figured out and learned a bit more.

Sunday 26 August 2018

HEROQUEST BOARD FROM SCRATCH. SO FAR.


Well.. these files were almost 100MB each. I had to shrink its size to be uploaded. From 7800x5700. So you wont get to see the full detail. This is the HQ board ive been working on the last few days. My main issue, I didn't have a good enough detailed template of the HQ board. So I made my own. Second image, I did the walls as close to HQ as I could. Then added all the rooms I did before. Third image I added the shadows on a separate layer so I could go back and fix it if I needed too. Fourth image is all the corridors in place. So, much more left to do.

I am doing a few additional rooms for the board that can be interchanged if needed, the moss effect tiles all over might be ok on its own, but a slight difference wont hurt. So I will see how it looks after I have finished with the shadows and lighting.

Here are a few tiles I have done so far for the board..


Tuesday 21 August 2018

Creating the Moss Dungeon set. It is now completed.

In Photoshop... the initial setup by DiceOfDoomBlog via YouTube in his tutorial Dungeon Tiles 00.

1. 2x2 inches. 300dpi.
2. Separate into 4 different tiles.
3. Render clouds into each tile by selecting each one.
4. Go into the layer style.
5. Hit pillow and emboss. select smooth. 100, up. 5, 10. Leave the rest.

Here is what I have done and changed from here.

6. Select your texture images bring them into the document and keep them on top of these tiles
you have just created. Adjust the levels to your liking, try and keep the basic layer visible you
created at the start.
7. Select all layers, duplicate it all and merge all duplicated layers. (So you always have the originals). Hide the originals.
8. Go into filter gallery and select posterize on the merged layer. Keep fiddling around with the options until you get the style that fits and likings to the design of a tile from Heroquest.
9. Once you are happy, go to edit. Define pattern. Save it as a pattern.

But..

Theres one issue, the edges of the outside tiles. So lets fix that before we move on. Otherwise it will look disastrous.

10. Double click the main layer you have been using and again, go into Bevil and Emboss. Hit pillow and emboss. select smooth. 100, up. 5, 10. Leave the rest.
11. Go into Layer Style again. Click on Inner Shadow. Blend mode. Linear burn. Opacity. 45%.
Angle. 138%. 0, 38, 29 for the next three options. Click ok.
12. Go back to edit. Define pattern. Try again using a new file and see the difference.


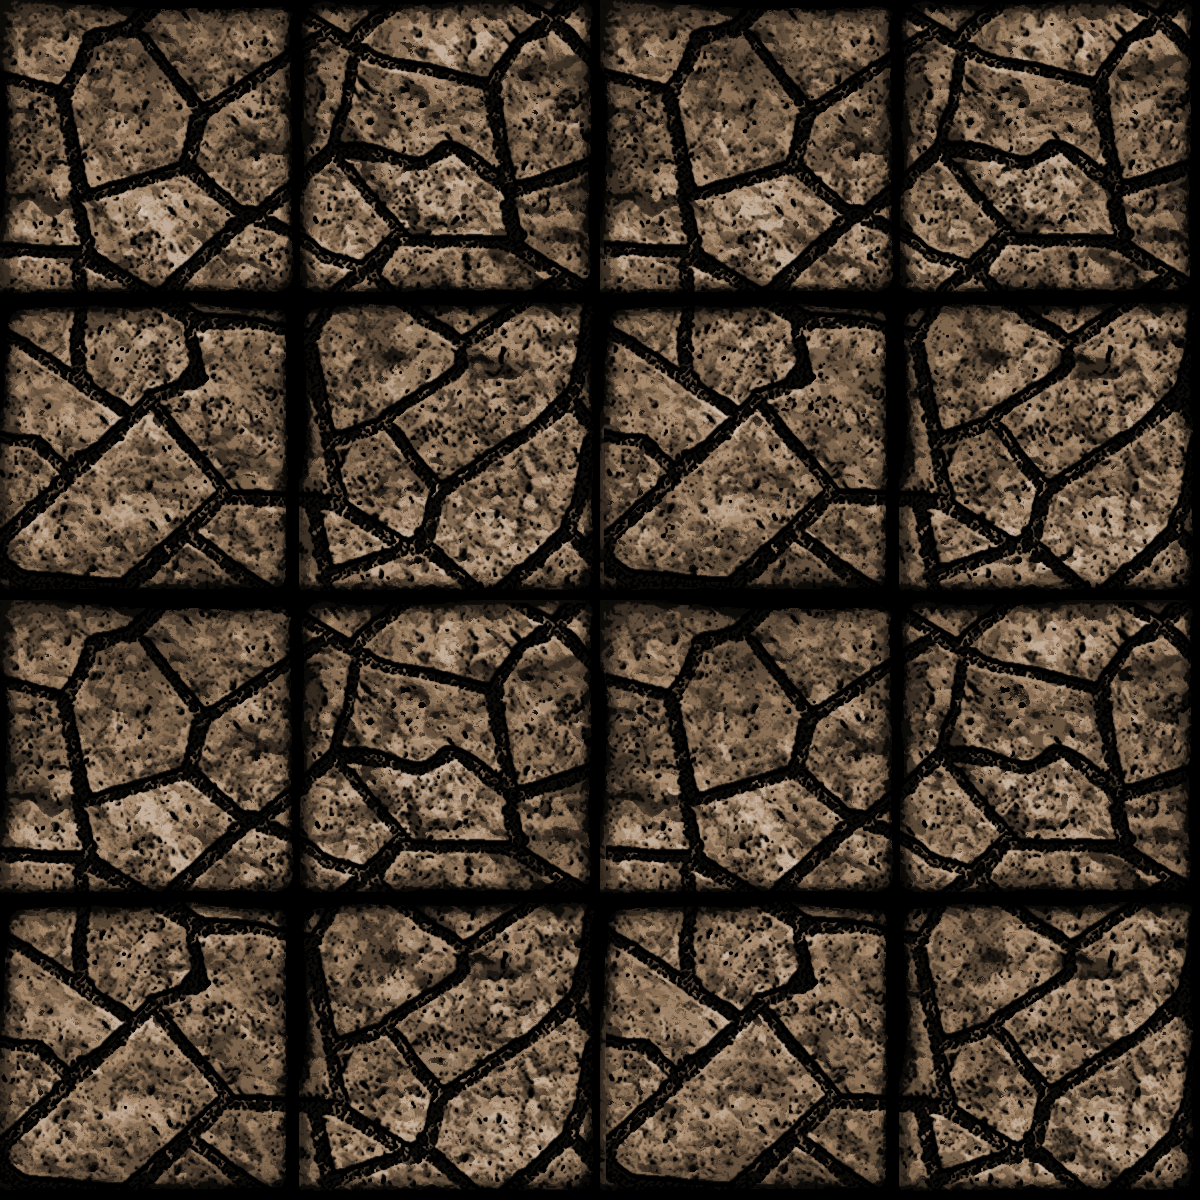
This is something a lot of people missed out and i had to separate that from the steps so you have an idea of what bugged me a lot of the time doing this, now it looks better. Save your document as a PSD file. Your originals are still intact, you can modify it again later on. Now you can make any size room with the pattern and it does look good.

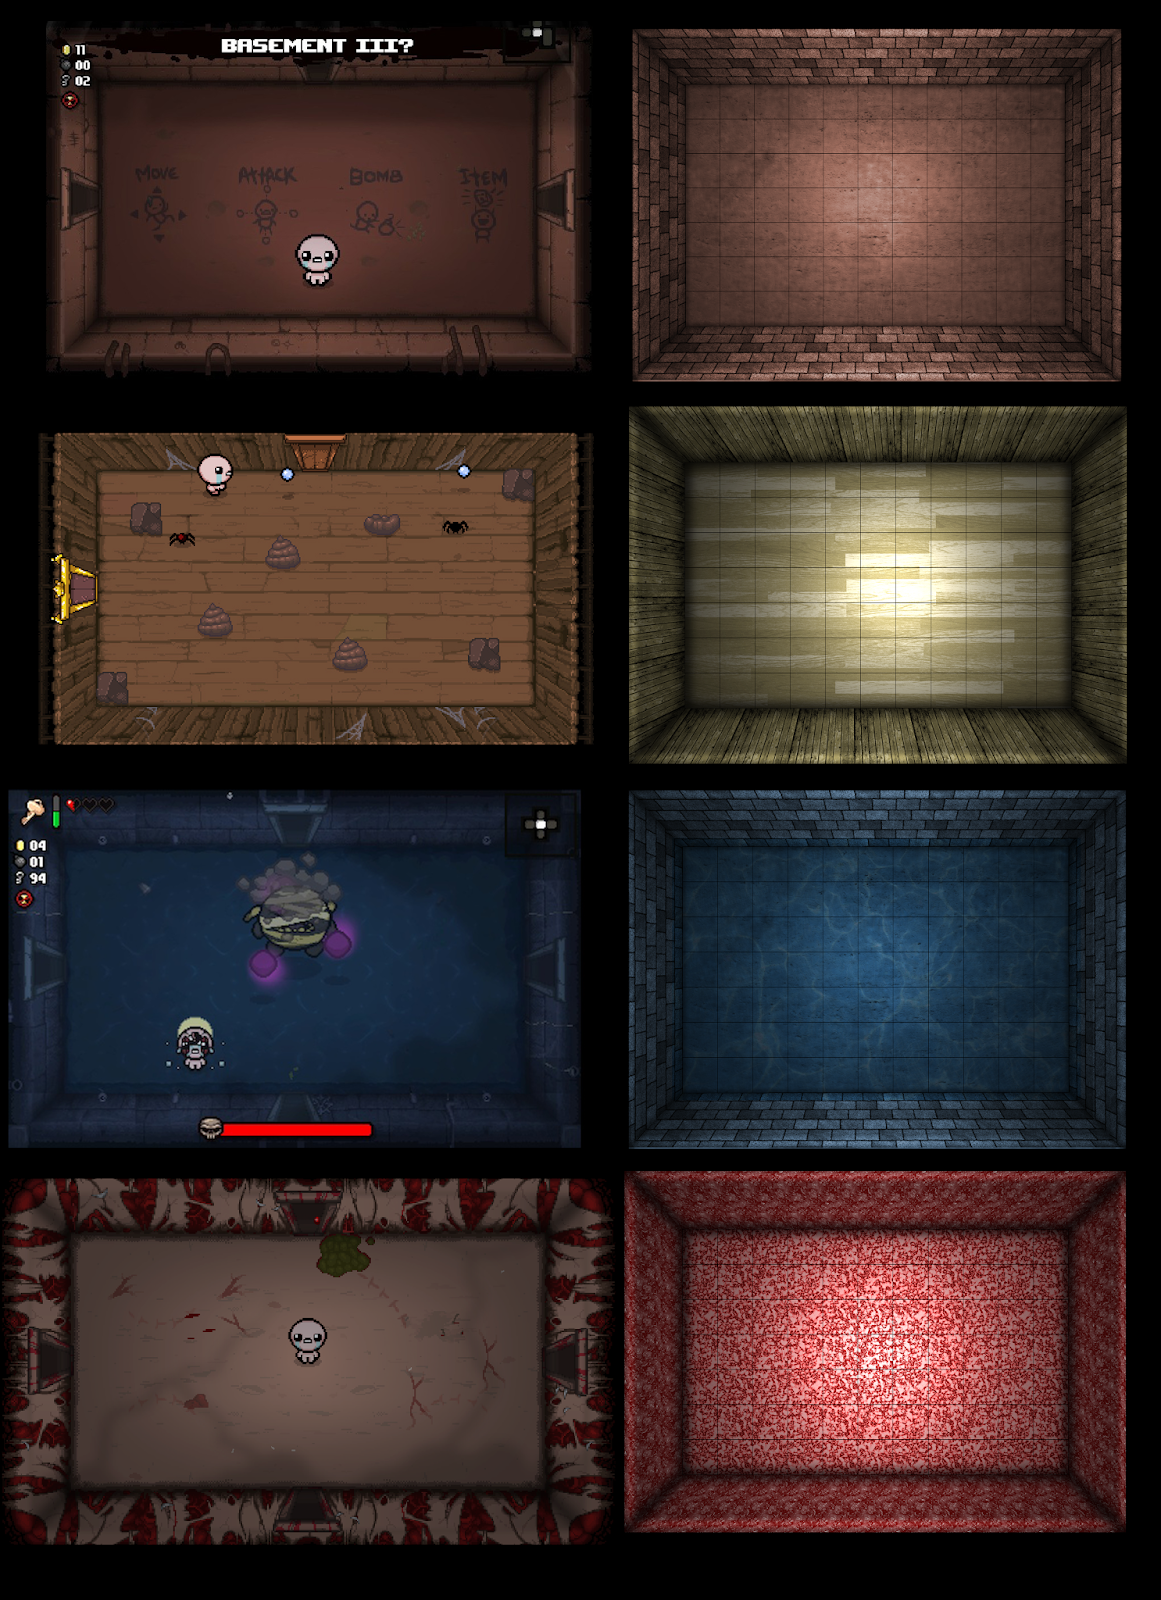
Here is my version trying to get as close to the style as i could, and i have tried so many styles and versions, merged different ideas from a lot of people that have creating dungeon tiles. This so far is my favourite way. Adding grass, cracks and so on.


My moss tile set I posted a few months ago have been completed. I redone the entire set using this method and it helped with issues of lines where images were poorly merged seamlessly. No lighting added. Just a natural blend of textures that helped with the depth, giving each tile set a different look along with the cracks in the tile set. I am compiling them all into a downloadable file. Ready to be printed and to be used. Keep an eye out.

Sunday 19 August 2018

Caricature. Fallout bobblehead edition.

Thats me face. This was insanely quicker than I thought it would take, 10 minutes for the main modification of the head. Further 5 minutes to change it up to a Fallout wallpaper, profile image, whatever. Seeing as its familiar to a bobblehead collectible found within the game. Not bad for a first go.


War may never change, but your skills in Photoshop should do.


Friday 17 August 2018

The Binding of Isaac Dungeon tilesets.. so far.

Well.. we have the Basement, Cellar, Flooded Caves and Scarred Womb. The last two I will probably change up, the walls in the flooded caves are essentially the same one used for the basement tileset. I may have to keep looking for better textures or I may just have to draw up some that will work when tweaking the images, a lot of the time if they are flat.. it wont look so good. The scarred womb tile is pretty good when zoomed in and compared to its actual size. But maybe I will just keep creating some of my own, if it fits and looks pretty good, I will keep them and scrap the Flooded Caves and Scarred Womb tilesets.


I guess again, it depends on taste. It may be a little hard to see the grid to the size as it is but it shows up pretty well. So will probably redo the flooded caves before moving on and finish that up before moving on to the next few sets. But the basement and cellar are both pretty good one its own. The doors and other objects in TBOIR are easily done but getting it right will be a while longer to complete. The doors didn't look right enough so I scrapped them. The rocks, gold, keys and random items are pretty easy to do, so will do those last after everything else.

The basic vanilla style tilesets from the game is what I will only be doing otherwise it will just get too cluttered. The idea is to do one basic tileset that can be printed as many times as needed for a random generated dungeon crawl.

Binding of Isaac Style Dungeon?

Of course it can be done. My problem learning this is trying to get a style using these textures to fit perfectly with one another. I dont really like dungeons that look a certain way. I prefer my dungeons and art, classic and retro.

So I began with a 15x9 inch (300dpi) grid. Making sure when printed it can, would, fit any dungeon miniature. 
 Next was the basic floor. As above I add the rulers to separate the walls from the floor. Added a texture, a basic stone image. Ensured I had one detailed enough. I ended up doing the copy and paste to fill the entire floor up. (Which of course ended up with visible errors). Took my regular paint brush, a lighter and darker colour of the same colour. Blended them together using a grunge brush, and painted all over the floor, inverting and deleted anything in excess outside the floors grid.

 Next was the walls of the dungeon. This I didn't have an idea of how to do. Never attempted it before. So took an image of a basic stone wall, something that was seamless enough to use. Covered the entire top row.

 Once I did that. I hit transform, perspective to get the "top down view". Copy and pasted the other three sides.

 Next.. was the clean up. Removing anything from the walls I didn't need. Simple enough...

 Adding next was a layer of black for the background. Adding black to the corners of the walls and floor edges, that would become shadows.. The walls were blended with a colour that would fit the floor better, adjusting the exposure and vibrance.

 Next. I gave the shadows some Gauz blur (24% around) to blend those shadows in a little better.. I rendered some lighting effects on the walls and the floor. (a single omni light, exact same for both). Removed some of the top sections of each side of the wall.

 Using a brush using just white, I attempted (depth using shadows not something ive done for a while). to give the dungeon some better lighting, started at the very top of the walls using just one row of the bricks. Gauz blur, transparency about 80%. Second row the same, but this time transparency was set to around 50%.

So that just leaves the doors to do. I may or may not do additional details in the dungeons. Webs, blood, water and so on, but I will take a bit of time to work out how to do them correctly. In the mean time, here is the final image of the Binding of Isaac dungeon with a picture of the fantastic game I used as reference.